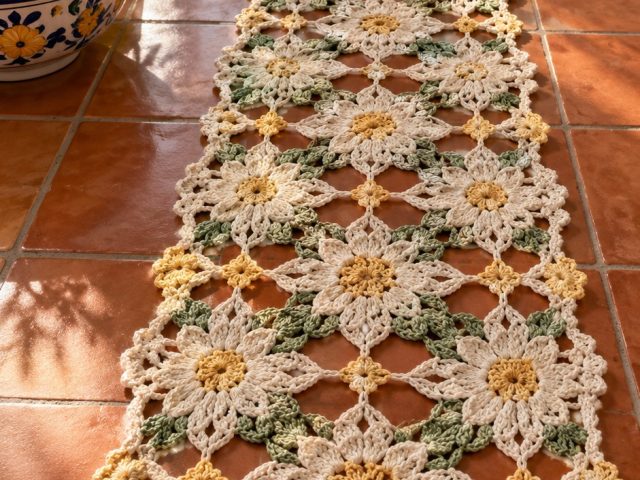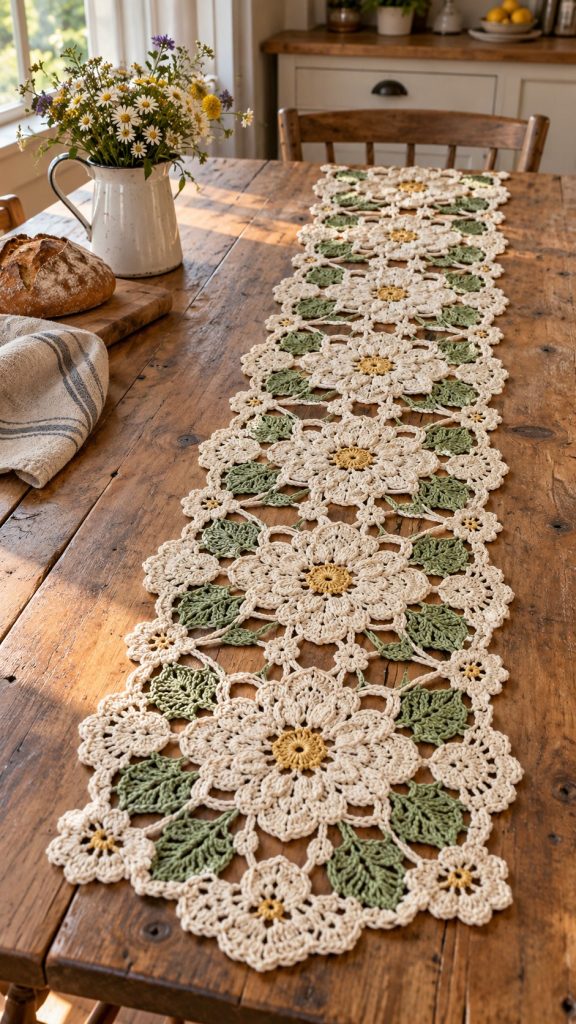
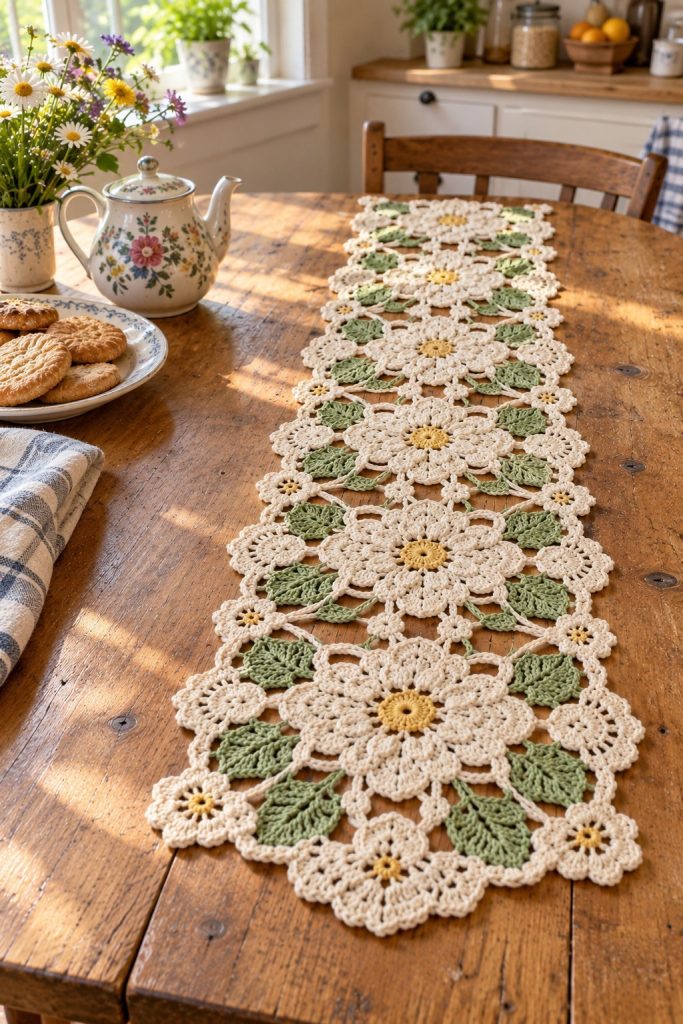
This elegant table runner is built from crochet floral motifs joined into a long runner—cream blossoms with golden centers and sage-green leaves create a vintage cottage look. Delicate openwork, layered petals and small connecting flowers give a lacy, handcrafted finish ideal for a dining table or sideboard. The pattern uses simple motifs repeated and joined as you work, perfect for making a custom length.
About this pattern
This Cream and Sage Floral Table Runner is made of repeated floral motifs joined into a long, lacy strip. Each large motif has a golden center, layered cream petals, and four sage leaves positioned to create a rhythmic, botanical repeat. The runner is airy yet sturdy, with small filler flowers and connecting chains creating the lace effect. The neutral cream and soft sage palette gives a timeless, cottage-style aesthetic ideal for casual or seasonal tables.
The pattern is modular—make as many motifs as you like to reach your desired length. Motifs are worked in rounds and joined with connecting chains as you go, minimizing finishing. A final scalloped edging polishes the runner.
Why you’ll love this pattern
I love how the large layered blooms read like hand-cut paper doilies but with modern texture and subtle color. The sage leaves add a fresh, natural pop without overpowering the soft cream petals. I also appreciate that you can customize the length and color palette easily—this runner makes a lovely gift or a special touch for Sunday brunch.
Cozy Accent
A warm touch for your space that transforms ordinary corners into inviting nooks filled with handmade charm.
Skill level & time
Ideal for those with basic crochet experience, featuring slightly more advanced stitches and techniques to expand your skills.
Requires 8-10 hours, ideal for a full day of immersive crocheting.
Materials & tools
🧶 Yarn & materials
- Worsted weight cotton yarn (#4), approximately 180-220g in Cream (main petals and filler flowers)
- 50-60g in Sage Green (leaves and connecting leaf details)
- 25-35g in Golden Yellow (small amounts for motif centers)
- Small amounts (10-15g each) of neutral contrast for any decorative edging or accents (e.g., antique cream or beige)
🪡 Tools
- 3.5mm (E) crochet hook for main work (adjust for your tension)
- 3.0mm (D) hook for slightly tighter detail rounds (optional)
- Yarn needle for weaving and sewing motifs together
- Scissors
- Pins and blocking mats (or towel and flat surface) for blocking motifs
- Stitch markers (at least 4-6) to mark round starts and joining points
- Measuring tape or ruler for spacing motifs
- Optional: small safety pins to hold joining loops temporarily
Abbreviations
- mr = magic ring
- ch = chain
- sc = single crochet
- hdc = half double crochet
- dc = double crochet
- tr = treble (tr) crochet
- dtr = double treble
- sl st = slip stitch
- inc = increase (2 sc in same st) or specified stitch
- dec = decrease (worked as specified)
- sp = space
- sk = skip
- BLO = back loops only
- FLO = front loops only
- st(s) = stitch(es)
- rep = repeat
- ( ) = work instructions in brackets as directed
- x = times
The pattern
— Large Flower Motif :
Round 1 : mr, ch1, 6 sc in magic ring, pull tight (6)
Round 2 : Inc in each st around (6 inc) (12)
Round 3 : (1 sc, inc) x 6 (18)
Info : Change to Golden Yellow for a defined center. Keep tail long for sewing into later rounds if you prefer.
Round 4 : (2 sc, inc) x 6 (24)
Round 5 : (3 sc, inc) x 6 (30)
Round 6 : (4 sc, inc) x 6 (36)
Info : This round expands the central disk to support petal foundations; keep tension even so petals sit flat.
Round 7 : Change to Cream. *ch3 (counts as dc), 2 dc in next st, ch2, sl st into next st* repeat around to make 6 petal foundations; join with sl st to first dc (6 petals)
Round 8 : Working in petal foundation ch2 spaces: *(ch2, 3 tr, ch2) in ch2 sp, sl st into top of next cluster foundation* repeat around to build petal height (6 petals)
Info : Be careful to work each petal symmetrically into its ch2 foundation. Use a stitch marker on the first petal if needed to track the round.
Round 9 : In each petal: ch1, sc into base, *ch3, (dc, tr, dc) into top of petal, ch3, sc into base* repeat for each petal (6 petal clusters remain)
Round 10 : Between petals: *sl st into next base st, ch5, sl st into next base st* around to create connecting loops (12 loops including between each petal)
Round 11 : Work small picot edging around all petal tops: in each ch3 sp from Round 9: (dc, ch3, sl st) to form a delicate picot; in chain-5 loops from Round 10: (sc, ch4, sc) for open lace effect
Info : At this point your large flower should read as a round disk with six defined petals and open loops between them. Block flat if the shape flares.
Round 12 : Working behind petals to add petal second-layer: Join yarn at back of a petal base, ch1, 6 sc evenly spaced across the back of petal base, sl st to next petal base; repeat for each petal to create a secure saddle for the second layer (36 sc total across bases)
Round 13 : Second-layer petal start: In each petal top (FLO if preferred): *ch4, (3 tr, ch2, 3 tr) into same sp, sl st to next top* around to create fuller petals (6 fuller petals)
Round 14 : Secure and shape second-layer petals: *ch1, sc around the base of the new petal, (ch3, sc) in each of the two outer loops to create curved edges* repeat for all 6 petals
Info : Use gentle blocking and pins to coax the second layer of petals to lie over the first. If pieces curl, wet-block and pin flat.
Round 15 : Create decorative lobes between petals: Join yarn in a base chain between petals and work *(ch6, sl st into next loop) x2* to form elongated connecting chains; repeat around (12 long loops)
Round 16 : Work a decorative ring around the entire motif: In each long chain from Round 15, work *(sc, hdc, 3 dc, hdc, sc) into chain center* to create a scalloped ring (12 scallops)
Round 17 : Add small filler flowers at each scallop junction: Join cream yarn and work small 5-petal flower motif in place (see ‘Small Flower’ section) or work (ch3, 2 dc, ch3, sl st) to simulate small bloom (12 small blooms or clusters)
Round 18 : Finishing round for large motif: Work sc evenly around outer edge to tidy joins and prepare for leaf placement; count should be around 72-80 sc depending on tension and exact cluster counts (estimate 76)
Info : Fasten off cream if you will join motifs in cream. Leave a 20 cm tail for sewing if joining by whip stitch instead of joining as you go.
— Leaf Motif (Make 4 per large flower) :
Round 1 : With Sage Green, ch6, sl st to form a small ring (6 ch ring)
Round 2 : Into ring: ch3 (counts as dc), 2 dc, ch1, 3 dc, sl st to base (6 dc cluster) (6)
Round 3 : Work along one side: ch1, sc in next st, hdc in next, dc in next, tr in next, dtr in tip (turn), now work down opposite side mirror: tr, dc, hdc, sc into base, sl st into base to shape leaf (no simple total count — shaping round)
Info : The leaf is shaped by working asymmetrical increases toward the tip and decreasing again; keep both leaves made in the same direction for mirroring when a leaf pair is placed around petals.
Round 4 : Edge detail: *sc around edge of leaf, in tip work (sc, ch3, sc) to create a tiny picot tip*; repeat to finish edge and sl st to base (approx 18-22 sc)
Round 5 : Veining: Switch to a slightly smaller hook if desired; with 1 sl st anchor at base, work a chain vein into leaf center: ch10, sl st back along chain to form a raised vein. Fasten off and leave tail for attaching (1 long vein)
Info : Make 4 leaves for each large motif and position two on either side of the motif so leaves form an ‘X’ pattern with petals.
Round 6 : Optional: Add a second small picot or tiny flower at the leaf join by working a 5 dc star in the joining base and sl st to secure (small decorative bloom)
— Small Flower (Filler Flower, Make many) :
Round 1 : mr, ch1, 6 sc in magic ring, pull tight (6)
Round 2 : Change to Golden Yellow for center: (inc) x6 (12)
Round 3 : Switch to Cream: *(ch3, sl st) into same st, sk 1 st* repeat around to form 6 little loop petals (12 loops)
Round 4 : Work sc around base to tidy: 1 sc in each sc and 2 sc in each loop base (estimate 18 sc). Fasten off leaving tail for joining.
Info : Small flowers are used to fill gaps between large motifs and at the outer edges for a gently scalloped border.
— Petal Detail and Outer Lace (Rounds for added texture) :
Round 1 : Re-join Cream at outer edge of a completed large motif (where Round 18 finished). Ch1, sc evenly around outer edge preparing for lace overlay (estimate 76 sc)
Round 2 : In each sc: *ch5, sk 2 sc, sl st in next sc* repeat around to create 12-15 larger arches depending on motif circumference
Round 3 : In each ch5 arch: *(sc, hdc, 5 dc, hdc, sc) into center of arch* to create a more elaborate scallop (12-15 scallops)
Info : This lace overlay adds depth to petals and provides many small points where motifs will be joined together using chain connectors and small flowers.
Round 4 : Work small connecting loops between scallops: *ch4, sl st to adjacent scallop base* around to make regular joining points (12-15 loops)
Round 5 : Finish with sc around entire motif edge including scallops and loops to tidy join points. Estimate 90 sc after finishing overlay (approximate—your count may vary with tension)
— Connector Chains and Join As-You-Go :
Round 1 : To join motifs in a strip, decide orientation: motifs are arranged in a single-file row with centers aligned. On a finished large motif, identify four leaf-point joining spots and four outer filler-flower spots for stable joins.
Round 2 : Work joining chains: From an outer loop of motif A, ch12 (or ch16 for more open spacing), sl st into corresponding loop on motif B to connect. Repeat for each expected joining point across motif edges (4 major joins per side)
Info : If you prefer not to join as you go, leave long tails and sew motifs together later—align centers carefully and pin before sewing for even spacing.
Round 3 : For stability, after initial sl st join, go back into each connecting chain and work *(sc, ch3, sc) across the chain to make it sturdier and decorative—this also hides slack and evens spacing
Round 4 : Where small flowers sit in inter-motif spaces, use their tails to whip stitch through chain loops and petal bases to anchor them; place small flowers every other connector to achieve the pictured rhythm
Info : Counting and symmetry here is key—work one complete motif junction then repeat across all motifs making sure each join mirrors the previous one to keep runner edges straight.
— Edge Scallop and Final Border :
Round 1 : Once all motifs are joined into a strip of desired length, work a border all around the composite runner. With Cream, join in any outer loop, ch1, sc around entire outer perimeter, working 3 sc into each small filler petal point (approximate total varies with runner length)
Round 2 : Scallop row: *ch5, sl st into 3rd ch from hook to create a picot-loop, sl st into next base 2 sc ahead* repeat around making even scallops (estimate 2 scallops per motif petal cluster)
Round 3 : Work into each scallop: *(sc, hdc, 5 dc, hdc, sc)* to create a rounded, textured finish along the whole edge. This gives a neat framed look and helps motifs hold their planar shape
Info : Take extra care on long runner lengths to keep border tension even; pin along the length every 10-15 cm before stitching the scallop row.
Round 4 : Final tidy round: sc around scallop join points and weave in any remaining tails by stitching them through several border rows for security. Fasten off and weave ends to the back.
— Alternate Blossom (Optional variation) :
Round 1 : Make an alternate large motif with 8 smaller petals for a varied rhythm: Start mr, ch1, 8 sc (8)
Round 2 : Inc in each st (8 inc) (16)
Round 3 : (1 sc, inc) x 8 (24)
Round 4 : (2 sc, inc) x 8 (32)
Round 5 : Create 8 narrow petals by working *ch4, (3 tr) in next st, ch1, sl st in same st* repeat around (8 narrow petals)
Info : This alternate motif adds visual interest when alternated with the main six-petal motif. Adjust joining chains so centers align comfortably.
— Reinforced Center Round (Optional for flat center) :
Round 1 : To strengthen centers use Golden Yellow: Join at center back, ch1, 12 sc around center disk (12)
Round 2 : (1 sc, inc) x6 (18) to create a slightly raised boss in center to help overlapping petals sit naturally
Info : This reinforcement reduces sag in the center when motifs are connected, especially useful on longer runners or with heavier tableware placed on them.
— Joining Many Motifs (Assembly as you go details) :
Round 1 : Decide total number of large motifs for desired runner length. In the pictured runner, 7 large motifs produce approximately 120-135 cm (47-53 in) depending on motif size. Adjust motif count as needed.
Round 2 : Always join motifs with the same orientation. To join motif N to motif N+1: align outer loops and using Cream, work sl st through the loop on motif N, ch12, sl st to corresponding loop on motif N+1, then work back along chain to secure.
Round 3 : When three motifs form a visible repeated pattern across the width of the runner, anchor small filler flowers at the crossing of chain connectors to maintain lattice spacing and prevent sagging.
Info : Pin motifs flat on blocking mat in final arrangement before finishing any border to guarantee straight edges and even spacing; blocking also helps open lacework for a refined finish.
— Finishing Touches and Blocking :
Round 1 : After joining and edging, wet-block runner: dampen evenly, pin to measurements on blocking board or towel, and allow to dry fully. Use rust-proof pins to avoid staining yarn.
Round 2 : Weave in ends: With tapestry needle weave each tail along the back into several motifs and trim close. For safety, secure with a dab of fabric glue if runner will see heavy use, placed on underside only.
Info : Final pressing with cool iron over a cloth can flatten any small ripples after blocking; avoid direct heat on cotton yarn without moisture as it can scorch.
Round 3 : Optional stiffening: If you prefer a very flat runner, spray lightly with diluted fabric stiffener and allow to dry under pins; test on a scrap motif first.
Info : Measure final runner length and record motif counts for future projects. This pattern is modular—store configuration notes to recreate identical sets quickly later.
Assembly
- Lay out all motifs in the desired order and orientation on a blocking board or towel, spacing them so petal centers align in a straight line; pin motifs flat to block before joining.
- Attach head-to-head neighbors by using the long chain join method: from a prepared outer loop on motif A, ch12 (or required length), sl st into the corresponding loop on motif B, then go back and sc along chain to strengthen; repeat for each joining point.
- Place the sage leaves in groups of four around each large motif (two on either side). Sew leaves to the motif base by whip stitching through the base rounds used in Round 12 and Round 5 of the leaf to secure.
- Anchor small filler flowers at each inter-motif junction: use the tail to whip stitch through adjacent chain connectors and petal bases, pulling taut to secure the lattice pattern.
- Once all motifs are joined, work the border rounds evenly around the entire runner, pinning the work to keep the edges straight and evenly tensioned while you crochet the scallop rows.
- Final finishing: wet-block the entire runner pinned to final measurements, allow to dry fully, then weave in all tails neatly on the underside using a yarn needle and secure with a small amount of fabric glue if needed.
💡 Important notes
- Use stitch markers consistently at the beginning of each motif round to avoid counting errors and maintain proper shaping
- Block each motif flat before final joining—blocking dramatically improves motif alignment and lace clarity
- Work joins symmetrically: connect motifs on the same corresponding loops to keep runner edges straight
- Tension consistency is crucial; crocheting too tightly will make motifs small and stiff, too loose will cause sagging in joins
- Leave long tails (8-10 cm) when fastening off motifs if you plan to sew them together later; these tails make neat sewn joins
- Pin the runner frequently during the border rounds to ensure even scallops and consistent spacing across the entire length
- For heavy-use tables, consider adding a non-slip pad beneath the runner to protect the yarn and table surface
- Test any stiffening or spray-on treatments on a scrap motif to ensure no color change or shrinkage
⚠️ Common mistakes to avoid
- Skipping stitch markers at the start of rounds can cause misalignment when motifs are joined; always mark your first stitch of each round
- Using a hook that is too large will create holes and floppy petals; strive for a slightly denser fabric than usual
- Not blocking finished motifs can make joining difficult and lacy edges look uneven; block motifs flat before final assembly
- Joining motifs without consistent spacing or tension creates a wavy runner; pin and measure frequently during assembly
- Pulling yarn tails too short when fastening off makes weaving ends difficult; leave 8-10 cm (3-4 in) tails for sewing and joining
- Rushing the leaf shaping rounds causes irregular leaf sizes; count stitches carefully and mirror shaping on paired leaves
- Not carrying color neatly or fastening off too often leads to bulky joins; carry short color stretches where sensible and hide ends in petals
Make it your own
I love how modular this design is — I often change colorways to suit seasons. Swap the golden center for a rust orange for autumn, or pale pink for spring, and the runner instantly changes mood.
I also advise experimenting with motif count and spacing: fewer motifs with longer connecting chains makes a lighter airy runner, while tighter chains create a denser, more doily-like finish. Using a slightly smaller hook for the overlay rounds gives a snappier lace edge.
If you want a sturdier runner, I sometimes reinforce centers with an extra round of sc in a contrasting color and block aggressively for a flatter motif. Don’t be afraid to personalize leaf shapes or add beads sparingly at centers for a touch of sparkle.
Frequently asked questions
What is the finished size of this table runner?
Finished size depends on the number of motifs and your tension. With 7 large motifs as pictured you should get approximately 120-135 cm (47-53 in) long and ~24-28 cm (9.5-11 in) wide. Adjust motif count to change length.
Can I use different yarn weights for this pattern?
Yes. Use a lighter or heavier yarn and adjust hook accordingly (use a hook 1-2 sizes smaller than recommended for a tight lace look). Remember that gauge changes will alter motif size and final runner dimensions.
Do I need to block motifs before joining?
Blocking is strongly recommended. Each motif blocks out to a cleaner shape, making joining easier and the final border lie flat and even.
How many motifs do I need for my table?
Measure your table and divide desired runner length by the approximate motif width (including joins). The pictured runner uses 7 large motifs; for a shorter runner use 4-5 motifs, for a long table 9+ motifs.
Can I machine wash the finished runner?
If using worsted cotton, hand washing or delicate machine wash in a laundry bag is best. Lay flat to dry to avoid distortion; always test care on a leftover motif first.
How do I keep the runner edges from stretching over time?
Use even tension on joining chains and border rounds, block thoroughly, and consider a light fabric stiffener if you need a very crisp edge. Avoid hanging the runner by its ends when wet.
Can I make this with different colors?
Absolutely. Swap the cream, sage and golden yellow for colors that suit your decor—pastels for spring, deep tones for autumn. Keep contrast between center, petals and leaves for the best visual effect.
What if my motif stitch count doesn't match exactly?
Small variations in stitch counts can be adjusted during joining by changing chain lengths slightly and adding small filler flowers at joins. If counts drift widely, re-check rounds and unravel to the last confirmed count.
This Cream and Sage Floral Table Runner brings vintage charm and handcrafted warmth to your table. Each motif comes together like a small garden: golden centers, soft cream petals and leafy sage accents form a delicate yet substantial runner you'll be proud to display. The pattern's modular design lets you customize length easily, and the finishing instructions help you achieve a professional flat finish. 🧶 Place it on a wooden table for a cozy, homey look. Happy stitching — your table will thank you! 🌼