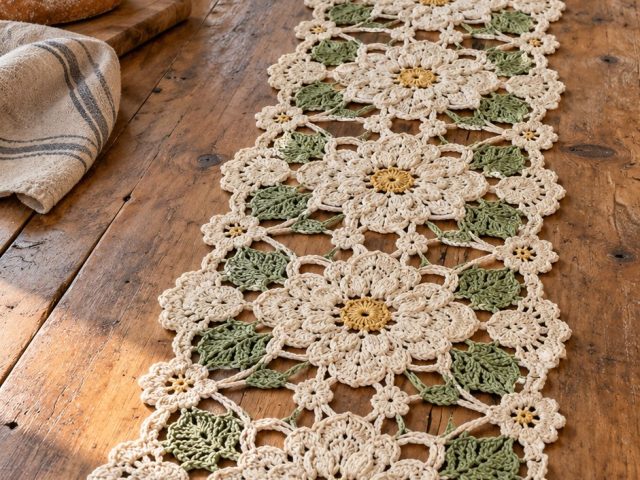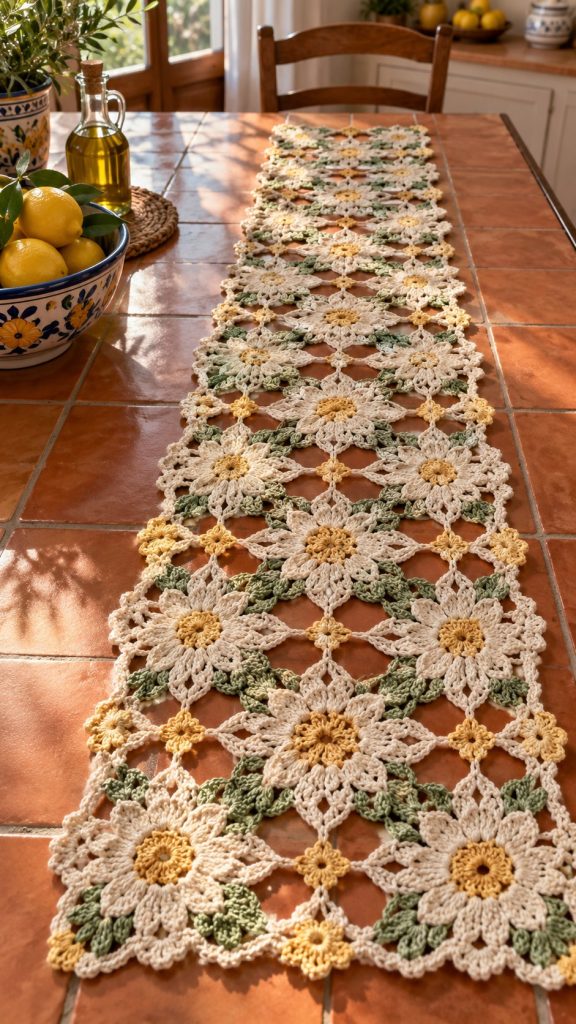
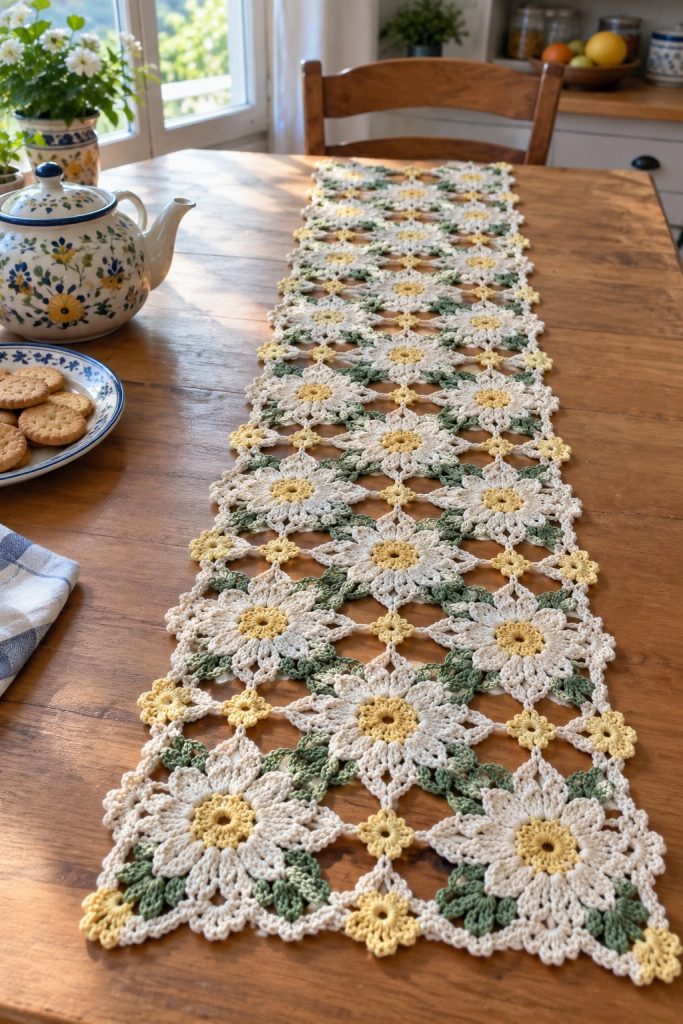
This airy Lemon Daisy table runner combines vintage-inspired daisy motifs, delicate leaf clusters and tiny connector blossoms to form a long, lacy centerpiece. Worked in soft cream, sunny yellow and sage green cotton, the runner lays flat and beautifully frames a dining table. The pattern uses join-as-you-go technique to assemble motifs into a continuous runner with a scalloped botanical edge.
About this pattern
This pattern recreates the delicate Lemon Daisy runner shown: interconnected eight-petal daisies with a textured puff-petal look, little yellow connector flowers, and soft green leaf pairs. The motifs are crocheted individually and joined using a join-as-you-go (JAYG) method, producing a flexible but stable lace runner. The colors are warm cream for petals, soft lemon yellow for centers and connectors, and sage green for leaves, giving a fresh, summery look ideal for kitchen or dining display.
The pattern includes full step-by-step rounds for the daisy motif, leaf segments, small connector flowers, join-as-you-go assembly and a finishing scalloped border. Clear Info notes guide color changes, tension, blocking and placement to help you achieve an even, polished finish.
Why you’ll love this pattern
I love this pattern because it balances delicate lacy detail with approachable construction. The petal clusters and little yellow connector blooms add a cheerful, handmade charm, while the join-as-you-go method saves time on sewing. I especially enjoy how the sage leaf clusters soften the white petals — the color combination feels like a bright, sunlit kitchen table.
Cozy Accent
A warm touch for your space that transforms ordinary corners into inviting nooks filled with handmade charm.
Skill level & time
Ideal for those with basic crochet experience, featuring slightly more advanced stitches and techniques to expand your skills.
Requires 8-10 hours, ideal for a full day of immersive crocheting.
Materials & tools
🧶 Yarn & materials
- Light worsted / DK cotton or cotton blend (#3), approximately 250-300g in main cream (petals and joining spaces)
- 60-80g in soft lemon yellow (centers and connector flowers)
- 80-100g in sage green (leaf clusters and accents)
- Small amounts (10-20g each) of contrast cream or beige for optional edging variation
🪡 Tools
- 3.5mm (E) crochet hook for main work (adjust to match gauge)
- 3.0mm (D) crochet hook for tighter petal details (optional)
- DK/light-worsted cotton yarn in 3 colors: cream, lemon yellow, sage green
- Tapestry/yarn needle for weaving ends
- Stitch markers (at least 6)
- Blocking mat and rust-proof pins
- Measuring tape
- Scissors
- Small spray bottle for light blocking mist
- Optional: small amount of fabric stiffener if you want a very crisp runner
Abbreviations
- mr = magic ring
- ch = chain
- sc = single crochet
- hdc = half double crochet
- dc = double crochet
- tr = treble (UK = double treble if noted)
- dtr = double treble
- puff = puff stitch (see note)
- sl st = slip stitch
- inc = increase (2 sc in same stitch or specified)
- dec = invisible decrease
- BLO = back loops only
- FLO = front loops only
- st(s) = stitch(es)
- sp = space
- rep = repeat
- ( ) = work instructions in brackets as directed
- x = times
The pattern
— Notes and Gauge :
Info : This runner is made of repeated daisy motifs joined as you go. Gauge is not critical, but for a similar look use DK/light-worsted cotton and a 3.5mm hook. One finished daisy motif measures approximately 10cm / 4 inches across blocked. The sample runner pictured uses 4 motifs across and 10 motifs long for an overall length of approximately 40 inches (102cm). Adjust motif count to fit your table.
— Daisy Motif (make many) :
Round 1 : With lemon yellow, make mr, ch1, work 8 sc into ring. Pull ring tight. Join with sl st to first sc. (8)
Round 2 : Ch1, 1 sc in same st, 1 inc in each st around (8 inc). (16)
Round 3 : (1 sc, inc) x 8. (24)
Round 4 : (2 sc, inc) x 8. (32)
Info : This creates a firm circular center for the daisy. Keep tension even and avoid tightening too much so the center lies flat. If your center cups, loosen hook tension slightly on the next round.
Round 5 : Change to cream. Ch3 (counts as first dc), *dc in next 3 sts; ch2; skip 1 st;* rep around to create 8 ch2 spaces between petal anchors. Join with sl st to top of starting ch3. (32)
Round 6 : Ch1, sc in same st, *ch5, skip ch2 sp, sc in next dc (anchor)* rep around creating eight ch5 loops for petals. Join with sl st. (32)
Info : Ch loops form petal foundations. Keep chains even and smooth; they will serve as the space to work puff petal clusters into.
Round 7 : Petal round: Join cream into first ch5 loop, ch2 (does not count as st), work 7-puff cluster into loop as follows: *(yarn over, insert hook in loop, yarn over, pull up loop) repeat 7 times, yarn over and pull through all loops, ch1 to close puff; sl st into base where loop attaches.* Repeat into each ch5 loop around to create 8 puff petals. Fasten off or continue. (32 petal anchors)
Round 8 : Info :
Info : If your puff petals are bulky, adjust the puff count to 5 or 6 puffs per petal for a flatter look. Pull final loop gently to keep each puff uniform in height.
Round 8 : Change to cream if not already. Working around the petals, sl st evenly in the base of each petal to tidy and anchor them; make 2 sl st into base of each petal and then 3 ch to reach the gap to the next petal. This round maintains the motif shape and does not change stitch count. (32)
Round 9 : Ch1, sc in same st, *(ch3, sc in next puff base) x3,* rep around to create decorative arches between petals. Join with sl st. (32)
Round 10 : Info :
Info : These arches give the daisy a light lacy look. Keep chain counts exact to ensure petals sit evenly when blocked.
Round 10 : Change to cream (if not), ch1, 1 sc in same st, *(3 dc cluster into next sc base, ch2, sl st into next sc base)* rep 8 times. This forms a textured ring just outside the puff petals. (32)
Round 11 : Ch1, sc in same st, *ch4, skip cluster, sc in next base* rep around to form 8 ch4 loops. Join with sl st. (32)
Round 12 : Petal outer layer: Join cream into first ch4 loop, ch1, (hdc, dc, tr, dc, hdc) all worked into loop to form a pointed petal outer shell. Sl st into next sc base to anchor. Repeat around to form 8 outer petal points. (32 anchors)
Info : Work petals into ch loops for open lacy petals. If your yarn is splitty, use a slightly larger hook for these taller stitches and then switch back to 3.5mm for joining.
Round 13 : Ch1, sc across petal tips with 1 sc in each anchor and 1 sc in each stitch around creating a tidy round of 32 sc. Join with sl st. (32)
Round 14 : Change to sage green. Ch1, *skip 3 sts, in next st work (sc, ch3, sc) into same st to make a small V that will become leaf base; ch2 to move to next leaf location* rep 8 times. Join with sl st. (32)
Round 15 : Leaf formation: Work into each V: join green into ch3 space, ch2, (hdc, dc, tr, dc, hdc) all in space, ch1, sl st in space base to form leaf point. Repeat for all 8 V spaces. This creates 8 leaves set around the daisy. (32 anchors)
Info : The sample motif shows paired leaves between daisies when assembled; we’ll create additional small serrated leaves in the join step to form the grouped leaf pairs seen in the photos.
Round 16 : Ch1, 1 sc in each st around to tidy the motif edge. (32)
Round 17 : Change to cream. Ch3 (counts as dc), *ch3, skip 3, dc in next sc* rep around forming long mesh spaces around motif for joining later. Join with sl st. (32)
Round 18 : Info :
Info : If you prefer a denser motif, omit this mesh round and instead work an additional sc round. The mesh makes the runner more open and airy like the pictured sample.
Round 18 : Final decorative scallop: With cream, *in each dc anchor work (sc, ch3, sc) into the ch3 loop from previous round; sl st into next anchor* rep around. Fasten off and weave in ends. Block motif flat, pinning petals and leaf points to shape. (32)
Info : One completed large daisy motif is now finished. Make as many daisies as needed for your runner layout. For the pictured runner use 40 daisies (4 across x 10 long) or adjust to suit your table.
— Small Connector Flower (make many) :
Round 1 : With lemon yellow, mr, ch1, 6 sc into ring. Tighten. (6)
Round 2 : Ch1, inc in each st around. (12)
Round 3 : (1 sc, inc) x 6. (18)
Round 4 : Ch1, sc in each st (18). Join and fasten off. (18)
Round 5 : Info :
Info : These tiny four-point connector blooms are worked flat and will be used to sit at the intersection points of the runner grid, linking daisies together cleanly. Make enough to place between every four large daisies in the grid.
Round 5 : With cream, join into any st, *ch3, sl st into next 3rd stitch to create a tiny petal loop; repeat to make 6 tiny loops around* fasten off. This creates a decorative star-like connector. (18)
Info : Make many small connectors; in the sample runner there are small connectors at every junction between daisies to form the delicate lattice effect seen in the photo.
— Leaf Pair Segment (make many) :
Round 1 : With sage green, ch6, join with sl st to form ring—you will work leaf pair clusters from here. (6)
Round 2 : Ch1, 6 sc in ring. (6)
Round 3 : Ch2, (hdc, dc, tr, dc, hdc) into first sc to form first leaf; sl st back to the base, ch2, repeat at next sc for second leaf to create a paired leaf unit. Fasten off and leave tail for joining. (6 anchors)
Info : Leaf pairs are used between daisies; in the sample each daisy is connected to its neighbors with a pair of leaves that visually form the green quatrefoil between flowers. Make enough leaf pairs to connect daisies as your grid requires.
Round 4 : Optional serration: With cream, pick up a tiny picot on the leaf edge by working sl st, ch3, sl st into the same space at the leaf tip to add a textured tip for realism. This is decorative and optional.
— Join-As-You-Go Assembly (JAYG) :
Info : Layout your motifs in the desired grid before joining. The photographed runner is arranged 4 motifs across by 10 motifs long. Work left to right across each row, joining each new motif to the previous motif(s) using the join rounds outlined below. Always block motifs slightly before joining for best results.
Round 1 : Place first daisy as the starting motif. For the second daisy in row: on its final cream mesh round, when you reach the point where a ch3 space aligns with the neighboring motif’s ch3 space, sl st through both the new motif’s ch3 space and the adjoining motif’s corresponding stitch to join. Continue around joining at 4 evenly spaced points per side so motifs connect at petal-quarter positions. No change in stitch count is required; you are replacing the sl st join with a sl st through both motif and neighbor. (32)
Round 2 : Info :
Info : When joining, keep slack even so motifs sit flat. If a joined corner pulls, undo the last 2 joins and reseat the motif to spread tension evenly across all join points.
Round 2 : For rows beneath the first row: position a new daisy so that it will be joined to two daisies above and two beside as needed. Use small connectors (yellow tiny flowers) at the four-way junctions: on the new motif’s joining round, when you intersect the four-way point, slip stitch into the connector flower ring (or join by working a small ch4 loop and sl st through connector center) to lock all four motifs together. This method forms tiny yellow quatrefoils visible in the photo. (32)
Round 3 : Info :
Info : The join count will depend on how many motifs are already placed. The important rule: join at the designated ch-spaces or sc anchors so petals of neighboring daisies meet without overlapping. Mark these join points before you start joining each motif to avoid mistakes.
Round 3 : When joining adjacent motifs diagonally, use a leaf pair segment to sit between them: attach leaf base with sl st into the ch3 mesh space of each motif, then secure the leaf pair with 2 sl sts or small scs through the leaf tail to the motif anchor. This creates the grouped leaf clusters pictured between daisies. (32)
Round 4 : Info :
Info : For a runner that is multiple motifs wide, assemble the first row completely. Then when you start the second row, join each motif both to the motif to its left and to the motif above. The second-row motif will therefore have 3 or 4 join points depending on position (edge vs center).
Round 4 : Edge join technique: For motifs at edges where no neighbor exists, leave the mesh space open and treat the outer side with a neat sc round (1 sc in each st) to create a straight edge that will later be given a scalloped border. (32)
Round 5 : Info :
Info : Make notes on a paper grid to track motif placement and which join points should be connected to connector flowers, leaves or left free for border shaping. This prevents missing joins and keeps the geometric layout consistent.
Round 5 : Continue joining motifs in this fashion. Each time you join a new motif to neighbors, fasten off and weave ends neatly at the back to keep the front clean. Use small, tidy slip stitch joins rather than bulky single crochet joins to maintain the lacy look. (32)
Round 6 : Info :
Info : As you work, lay the joined portion flat and pin lightly to your blocking surface to ensure the runner maintains a straight edge while additional motifs are attached. Check that tiny connectors sit centered between four daisies and that leaf pairs create the soft green quatrefoil shape.
— Decorative Border and Scalloped Edge :
Round 1 : Once all motifs are joined into the full runner layout, work a tidy sc round in cream all around the entire perimeter: attach yarn at one corner, ch1, then sc evenly in side stitches and around petal tips, placing 2 sc in any large gap to keep edge flat. This round will likely be variable in stitch count depending on motif count; measure as you go. (variable)
Round 2 : Info :
Info : Distribute increases (2 sc in one stitch) evenly so edges remain flat. Mark quarter points on the border to help space increases evenly for symmetry.
Round 2 : With cream, ch3 (counts as dc), *in next edge space work (dc, ch1, dc) to form a shell; skip 2 sc on straight edges and skip to next petal tip on scalloped sections; rep around.* Join with sl st. This creates a series of shells along the edge. (variable)
Round 3 : With yellow, accent the shell centers by working a small picot: join yarn into the center ch1 of each shell, ch3, sl st into the center, fasten off. This step adds the little yellow dots along the border that echo the runner’s connector flowers. (variable)
Info : If your runner has corner points that jut out, add extra small flower connectors at corners to maintain a balanced, floral silhouette. Use the small connector flower pattern for corner emphasis.
Round 4 : Final scallop tidy: With cream, work a final round of sc in BLO around the shells to give a delicate raised edge and to hide any visible join tails. Weave in ends and trim. (variable)
Info : Blocking after the final border is essential. Pin the entire runner to a flat blocking surface, gently steam or spray with water and allow to dry fully for crisp petals and a flat runner.
— Finishing Touches :
Round 1 : Weave all ends at the back of the runner using a yarn needle; hide tails along the motif joins and through leaf stitches to keep them invisible. Clip tails close after securing. (Info)
Round 2 : Lightly block the runner: pin motifs flat to the desired dimensions, spray with water or use a steam iron from a distance, and leave to dry for several hours to set shape. Remove pins carefully. (Info)
Round 3 : Optional: If you want a stiffer runner for a formal table, apply a light fabric stiffener following the product instructions after blocking. Allow to dry completely before use. (Info)
Info : Care instructions: Hand wash gently in cool water with a mild detergent, reshape and dry flat. Avoid machine washing or tumble drying to preserve the motif texture and cotton yarn integrity.
Assembly
- Attach daisies row by row using join-as-you-go: join each new daisy to its left neighbor at 4 anchor points along the mesh round using sl stitches through both motifs; pin each motif in place before joining to ensure even spacing
- When adding a new row beneath an existing row, join each daisy both to the motif immediately above and to the adjacent left motif so each interior motif has 3-4 join points for stability
- Use the small yellow connector flowers at every four-way intersection: position connector in the center, then on the new motif's final round slip stitch through the connector center to secure all four motifs together
- Attach leaf pair segments between daisies by slip stitching the leaf base into ch3 mesh spaces of both adjacent daisies; secure leaf tails with a couple of tiny scs or sl sts for a neat anchor
- For edges where no neighbor exists, work an extra sc round to create a neat straight edge before working the scalloped border; place increases evenly to keep edge flat
- Pin entire runner on blocking mat and steam or mist gently to shape petals and leaves after all joins and the border are complete
- Weave in all ends at the back, running tails through a few motifs to hide them; trim close after securing
- If desired, apply a light fabric stiffener for a crisp finish; follow product instructions and test on a small motif first
💡 Important notes
- Use stitch markers to mark the beginning of rounds and key join points during join-as-you-go to avoid miscounting and uneven joins
- Block individual motifs lightly before joining to ensure petals and leaf points are flat and even
- When joining motifs, keep tension consistent and do not pull tightly; joins should be secure but allow the runner to lie flat
- Weave in color change tails as you go to avoid a large number of loose ends at the end of the project
- If making a runner longer or shorter, add or remove motif repeats rather than stretching motifs to fit
- Pin the runner frequently during assembly to check that edges remain straight and motifs align across rows
- For a firmer fabric, use a slightly smaller hook; for softer, more drapey fabric, go up one hook size
- Label motifs as you make them to track which motifs are already joined and where connectors should be placed
⚠️ Common mistakes to avoid
- Skipping stitch markers at the beginning of rounds can cause misaligned joins and uneven motif edges; mark the first stitch of each round
- Using yarn with inconsistent weight or tension leads to mismatched motif sizes; swatch and check gauge before starting
- Not blocking motifs before final joining may make edges wavy and prevent crisp connections; block motifs lightly to flatten petals
- Joining motifs too tightly during JAYG compresses petals and distorts the lacy look; join gently and check spacing as you go
- Failing to weave in ends as you change colors creates a messy back; secure color changes and weave ends into nearby stitches
- Inconsistent stuffing or tugging when pulling puff stitches can flatten petals; maintain even tension when making puff clusters
- Not counting chains in chain spaces accurately when working connectors leads to mismatched joins; recount spaces between motifs frequently
Make it your own
I love how versatile this Lemon Daisy runner is — I often change the color palette to match seasons. Try pale blue centers with cream petals for a cool spring look, or switch to warm terracotta tones for autumn. Adjust the number of motifs to make placemat-sized pieces or a full table-length runner.
I also enjoy experimenting with border styles: a tighter picot edge makes the runner feel more delicate, while a bold single crochet border gives a cleaner, modern finish. If you want a sturdier tabletop accent, use a slightly firmer cotton and a smaller hook for a denser fabric.
Don’t be afraid to add small beads to the connector flowers for a subtle sparkle, or to embroider a tiny initial on one corner for a personalized gift. The construction is forgiving and a great canvas for your creativity.
Frequently asked questions
What is the finished size of this runner?
The sample runner (4 motifs across by 10 motifs long) measures approximately 102 cm (40 inches) long and 25 cm (10 inches) wide. Exact size depends on your yarn and tension; test once a motif is blocked for accurate planning.
Can I use different yarn weights for this pattern?
Yes. Using thicker yarn (worsted) with a larger hook will enlarge each motif and reduce the number needed, while thinner yarn (sport or fingering) will produce finer motifs and a more delicate runner. Adjust motif counts accordingly.
Do I need to join motifs as I go or can I sew them later?
Either method works. Join-as-you-go produces a neater finish and saves sewing time. If you prefer, you can crochet all motifs, block them, then sew or whipstitch them together using matching yarn.
How much yarn will I need?
Approximately 250-300g of cream DK cotton, 60-80g lemon yellow, and 80-100g sage green for a runner similar to the photographed sample. Exact amounts vary with motif count and yarn brand.
Can I make the runner any length?
Absolutely. Increase or decrease the number of motif columns and rows to achieve the desired length. Remember to plan for connector flowers and border adjustments if changing layout significantly.
How should I block the motifs?
Pin each motif flat on a blocking mat to the desired dimensions, mist lightly with water, and allow to dry fully. Pin petal tips and leaf points to open and shape the lace. Then join motifs after blocking or block again after the runner is assembled.
Can I machine wash this runner?
Hand wash is recommended for cotton lace runners to preserve shape and avoid distortion. If machine washing, use a mesh bag and cold delicate cycle, then reshape and dry flat.
What stitch creates the puff petal effect?
The puff petal is created using multiple yarn-over pulls into the same loop followed by pulling through all loops on the hook, then securing with a ch1. Adjust the number of pulls to change petal height.
This Lemon Daisy table runner brings a touch of sunshine to any table with its lacy petals, tiny yellow connectors and soft sage leaf clusters. Each motif joins into a continuous, airy fabric that’s as lovely lit by morning sun as it is under candlelight. Working this runner is a wonderfully meditative project—chunk it into motif sessions and assemble over a few cozy evenings. 🧶🌼 Enjoy the peaceful rhythm of petals and stitches, then proudly display your handmade centerpiece! 🎀