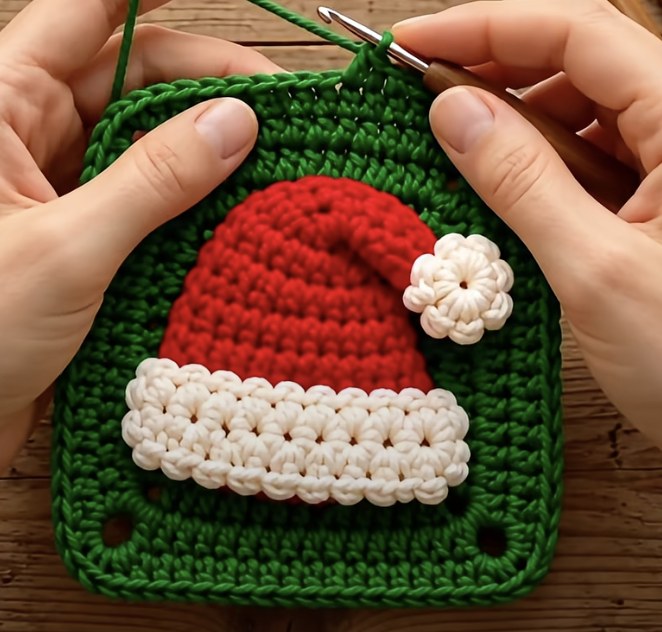
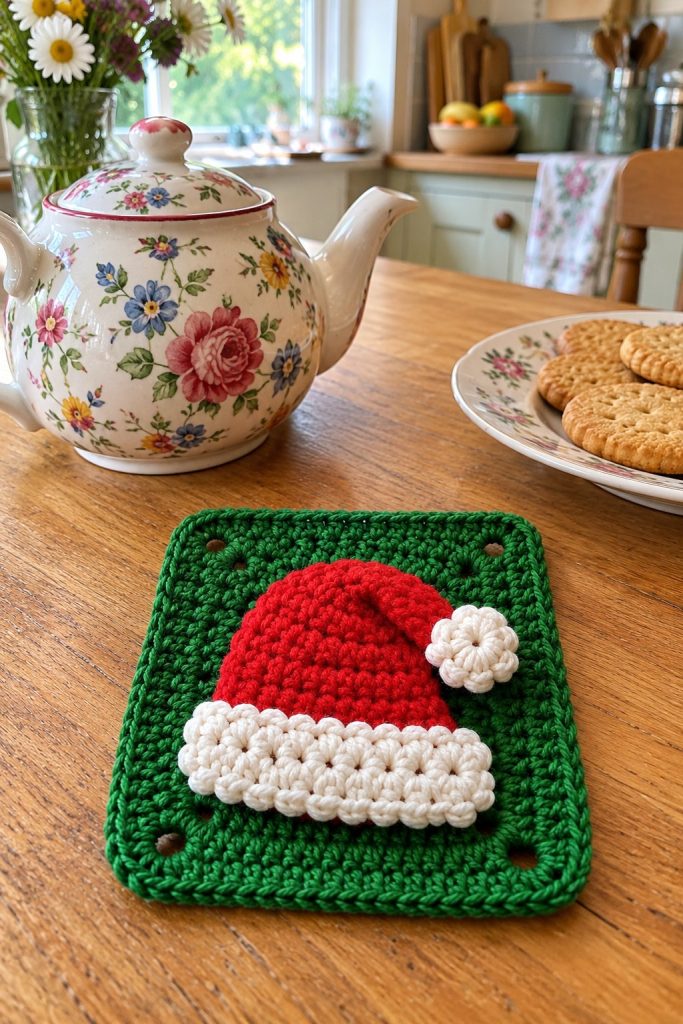
A festive crocheted granny-style square featuring a textured red Santa hat with a fluffy white brim and pompom. Worked in sturdy worsted-weight yarn, the square frames the applique with a neat green background and rounded corners. This pattern shows how to crochet the base square, the little Santa hat applique, the fluffy brim and a small pompom flower — perfect for ornaments, coasters, or holiday garlands.
About this pattern
This pattern recreates a cheerful Santa Hat Granny Square: a green rectangular/rounded-corner base with a small red Santa hat appliqued to the center. The hat has a textured white brim and a tiny white pompom-flower accent. The square pictured is worked in worsted-weight yarn with clear stitch definition and a tight gauge so the applique sits nicely on top. The design is compact enough for coasters, mug rugs, or to use as a festive patch on bags and cushions.
The pattern includes step-by-step instructions for the base square, the hat cone, the textured brim and the little pompom/floral accent. I include extra Info sections for placement, stuffing/blocked shaping tips and stitch techniques like working in BLO for ridges.
Why you’ll love this pattern
I love how simple shapes combine to create an instantly recognizable and joyful holiday motif. The textured white brim and the little pompom give the hat a hand-stitched, cozy feel, while the sturdy green base frames the design beautifully. I especially enjoy that the whole motif can be used as a coaster, a decorative patch, or strung into a garland — it's versatile and quick to make.
Holiday Cheer 🎄
Festive fun for the season, bringing handmade magic to celebrations and creating new family traditions.
Skill level & time
Ideal for those with basic crochet experience, featuring slightly more advanced stitches and techniques to expand your skills.
Takes 3-5 hours, perfect for an afternoon or evening of relaxing crochet.
Materials & tools
🧶 Yarn & materials
- Worsted weight yarn (#4), approximately 80-100g green for the base square (deep Christmas green as pictured)
- 25-35g red worsted weight yarn (#4) for the Santa hat cone
- 25-30g white/cream worsted weight yarn (#4) for the hat brim and pompom
- Small scraps (5-10g) of contrasting yarn (optional) for embroidery or extra decoration
🪡 Tools
- 4.0 mm (G) crochet hook for main work (or hook recommended for chosen yarn)
- 3.5 mm (E) crochet hook for tighter applique work (optional)
- Yarn needle for sewing pieces and weaving ends
- Scissors
- Stitch markers (at least 3-4)
- Pins for assembly and placement
- Small amount of polyester fiberfill if you choose to make the pompom slightly 3D
- Optional: blocking board and pins to square the base
- Optional: fabric glue for securing small embellishments
Abbreviations
- mr = magic ring
- ch = chain
- sc = single crochet
- hdc = half double crochet
- dc = double crochet
- tr = treble crochet
- inc = increase (2 sc in same stitch, or specified stitch)
- dec = invisible decrease (sc2tog)
- sl st = slip stitch
- BLO = back loops only
- FLO = front loops only
- sp = space
- st = stitch
- rep = repeat
- ( ) = work instructions in brackets as directed
- x = times
- RS = right side
- WS = wrong side
The pattern
— Square Base (Green) :
Notes : This base is worked in continuous rounds to create a compact rectangular/rounded-square background for the Santa hat applique. Use a slightly larger hook if you prefer looser fabric; the sample uses worsted yarn and a 4.0 mm hook to produce a firm but flexible square approximately 4.5″ x 6″ (11.5 x 15 cm). Keep a stitch marker at round start. Work tightly enough so the hat can be sewn on neatly.
Round 1 : Ch 4, sl st to form ring (or start with a small foundation ring). Ch 1, 6 sc into ring, pull ring tight (6)
Round 2 : Inc in each st around (12)
Round 3 : (1 sc, inc) x 6 (18)
Round 4 : (2 sc, inc) x 6 (24)
Info : Place a stitch marker at the first stitch of this round to identify the start. Keep gauge consistent; we will be increasing evenly to form a broad rectangle that will be shaped with later rounds.
Round 5 : (3 sc, inc) x 6 (30)
Round 6 : (4 sc, inc) x 6 (36)
Round 7 : (5 sc, inc) x 6 (42)
Round 8 : (6 sc, inc) x 6 (48)
Info : At this stage the shape is roughly circular. Our intent is to work several even rounds to build the fabric, then introduce alternating shaping to create soft, rounded corners. Continue counting carefully.
Round 9-12 : 1 sc in each st (48)
Round 13 : (7 sc, inc) x 6 (54)
Round 14 : 1 sc in each st (54)
Info : If you’d like a slightly larger square, work one more increase round: (8 sc, inc) x 6 = 60 sts. The sample stays at 54 for a compact coaster-size base.
Round 15 : (2 sc, inc) x 18 (72)
Round 16 : 1 sc in each st (72)
Info : We will begin to shape the sides into flattened edges rather than a round disc. To do that, we introduce ‘edge rounds’ where we work in BLO for one round to create a subtle ridge that reads as a border, then work increases at approximate quarter points to broaden the corners.
Round 17 : 1 sc in each st BLO (72)
Round 18 : (8 sc, inc) x 8 (80)
Round 19-22 : 1 sc in each st (80)
Info : At round 22 choose four evenly spaced points for decorative ‘eyelets’ — these are the small holes visible in each corner quadrant. To create the four eyelets, we will use chain spaces in round 23 while maintaining overall stitch count by replacing sequences of 3 sc with ch 3 loops and sc into the next stitch. Keep track of the quarter points by dividing your round count by 4 (80 / 4 = 20). Mark them with pins for accuracy.
Round 23 : *Work 19 sc, ch 3, skip next 3 sts, sc in next 1 st; rep from * 3 more times to finish round. After completing the last section, adjust the final few stitches to land on the marker — final approximate count 80, with four ch-3 eyelets formed across the round (80)
Round 24 : 1 sc in each st and in each ch-3 loop around (80)
Round 25 : Work 1 sc in each st BLO to create a subtle ridge and frame the square (80)
Info : If you want more pronounced rounded corners, on round 26 work an extra sc-inc at each corner quarter point (i.e., add 1 extra sc in the stitch immediately before and after each ch-3 eyelet). This will slightly increase the count; if you do this method, your round 26 becomes (add 8 sts) final count 88. The sample keeps even 80 sts by leaving corners soft.
Round 26-28 : 1 sc in each st (80)
Round 29 : Change to a neat edge technique: ch 1, *sc in next 2 sts, hdc in next st* repeat around; this creates a tighter texture at the border (80)
Round 30 : Sl st evenly around the edge to tidy. Optionally fasten off and weave ends or continue to border rounds below.
Info : Blocking tip: If your base looks a little wavy, damp-block to square by pinning on a board to desired shape. The small eyelets will open a little; this is fine and decorative. The base is now ready for the Santa hat applique placement.
— Santa Hat (Red Cone) :
Notes : The red hat is worked in continuous rounds in single crochet to form a neat cone. Start tightly and increase for the hat opening to sit flat against the base. Use a slightly smaller hook (3.5-4.0 mm) to give the hat some firmness so it retains a domed shape when sewn on.
Round 1 : mr, 6 sc in mr (6)
Round 2 : Inc in each st (12)
Round 3 : (1 sc, inc) x 6 (18)
Round 4 : (2 sc, inc) x 6 (24)
Info : At round 4 the hat is broadening to form the open base; the finished opening will be sewn onto the base square. Try the hat against the base and mark how many rounds you want visible above the brim. The sample hat’s open edge sits around 6-8 rounds tall from the brim line.
Round 5 : (3 sc, inc) x 6 (30)
Round 6 : (4 sc, inc) x 6 (36)
Round 7 : 1 sc in each st (36)
Round 8 : 1 sc in each st (36)
Round 9 : (4 sc, dec) x 6 (30)
Info : Begin shaping the cone by decreasing. Stuffing note: the hat sits flat when unstuffed; I recommend only a tiny dab of polyester fill if you want a slightly raised crown. The sample hat is left unstuffed and flattened slightly when sewn to the base.
Round 10 : (3 sc, dec) x 6 (24)
Round 11 : (2 sc, dec) x 6 (18)
Round 12 : (1 sc, dec) x 6 (12)
Round 13 : 6 dec (6)
Info : At round 13 the cone is closing. For a long slouched tip like the photo, instead of closing completely, stop decreasing at round 11 (18 sts) and begin working a short straight section of 5-8 rounds even to lengthen the slouch, then decrease at the tip to finish. The sample continues gently to create a tapered slouch of 6 extra rounds.
Round 14 : 1 sc in each st (6) – OR (if adding slouch) ch 1 and work 6 sc for 5 rounds to extend the tip
Round 15 : Fasten off leaving long tail for sewing if you closed the cone. If you extended for a slouch, decrease gradually over 3-4 rounds until 6 sts remain; fasten off leaving long tail for sewing (6)
Info : Leave a 20-30 cm (8-12″) tail for sewing the hat to the square base. Pin the hat to the square before sewing: place the open red edge where you want it to sit just above the brim area of the white strip and adjust position so the slouch drapes slightly to the side.
— Hat Brim (White Textured Band) :
Notes : The white brim pictured is a textured, slightly raised band made with clusters/puff-like stitches to mimic a fluffy fur band. This can be worked as a separate strip and sewn on, or worked directly around the base after the hat is attached. The sample works the brim as a separate strip then sews it to the hat opening.
Round 1 : With white yarn, ch 16 (or adjust to match hat opening width). Row-scheme: we will work a short strip in rows to create the band. Ch 1, sc in 2nd ch from hook and across (15)
Round 2 : Ch 1, turn. *Skip next st, work 5 dc cluster (puff or star cluster) in next st, skip next st, sc in next 2 sts* rep across to end – finish with sc in last st. This creates a row of puff clusters set within single crochets. Count approx (15 with 3 puff clusters across depending on spacing)
Round 3 : Ch 1, turn. Sc across in each st, working into spaces between puffs to keep strip flexible (15)
Round 4 : Repeat Round 2 to create a double-layered puff effect (15)
Info : To create a very puffy texture, use the ‘yarn over, insert, yo, pull up loop’ puff stitch: yo, insert hook, yo, pull up loop to height, repeat 4-5 times in same base stitch, yo and pull through all loops, ch 1 to close. Practice on a scrap to get consistent puff sizes.
Round 5 : Ch 1, sc across row to tidy edges (15)
Round 6 : Fold strip lengthwise so that puffs face out; sl st through back loops only along the long edge to seam into a short circular band. The final circumference should match the hat opening: approx 12-16 sc circumference depending on hat size. Adjust row count if needed to match opening.
Info : If your brim band is slightly larger than the hat opening, you can ease it in by sewing with evenly spaced gathers; if slightly smaller, add an extra sc row before seaming. The look should be a soft, flat band that sits over the red cone opening.
Round 7 : Fasten off leaving a long tail for sewing. If working the brim directly onto the hat, instead seam it onto the hat opening using slip stitches while the hat is on the hook.
— Pompom Flower Accent (White) :
Notes : The little pompom on the slouched tip in the sample is rendered as a small 6-petal ‘flower’ puff. You can make this flat or slightly 3D by adding a bit of stuffing inside the petals. Use white yarn and a 3.5 mm hook for a compact result.
Round 1 : mr, ch 1, 6 sc into mr, pull ring tight, sl st to first sc (6)
Round 2 : Work 6 petals: *ch 3, (yo and pull up loop 4 times in the same st to form a puff of 5 loops; yo and pull through all loops), ch 3, sl st in next st* repeat from * to * 6 times to create 6 small puff petals around center. Fasten off leaving tail for sewing.
Info : If you prefer an actual pompom, make a small wound pompom with white yarn and trim into a neat ball. Sew the pompom/flower to the tip of the slouch with several secure stitches. If using stuffing, add a pea-sized amount before finishing the petals to give subtle volume.
Round 3 : Sew the flower/pompom to the side of the hat tip so it sits slightly forward. Secure with stitched passes through the cone and weave in ends.
— Border & Final Edge (Green) :
Notes : Once the hat and brim are attached, finish the base with a tidy rounded corner edge and tidy the eyelet holes. We’ll work a final decorative border in green to frame the square and reinforce the eyelets for hanging.
Round 1 : With green yarn join at any round-end position on the base. Ch 1, sc around evenly working 1 sc in each st and 3 sc in each corner area to maintain shape (80)
Round 2 : 1 sc in each st BLO for one round to deepen the border ridge (80)
Info : Reinforce the four eyelet spaces by working 6 sc around each ch-3 loop: when you reach a ch-3 loop, work (sc, hdc, sc) into the loop, sl st to the next regular st, then continue. This tidies the hole and creates a reinforced rim.
Round 3 : *Sc in next 7 sts, in next ch-3 loop work (sc, hdc, sc), sc in next 7 sts; rep from * two more times to end. The stitch count remains approximately the same as you integrate the loops into stitch work (80)
Round 4 : Sl st around to tidy edge and finish border. Fasten off and weave ends into the back of the base.
Info : If you plan to hang the square (garland or tree), use the reinforced eyelets to thread ribbon or twine. Ensure the eyelet rims are snug and secure before hanging any weight.
— Assembly & Sewing Instructions :
Info : Before sewing, pin all elements in place on the flat base: the white brim band should sit just below the center and the red cone open edge should be placed so the white brim overlaps by about 2-3 mm. The slouch should drape to one side with the little pompom attached at the tip.
Round 1 : Place red cone on base and align brim area where it will be stitched. With red tail from hat opening, whip stitch the red opening to the base through the back loops of the base and the inner loops of the hat, making evenly spaced small stitches to avoid visible seams (approx 12-16 stitches around depending on opening).
Round 2 : Sew the white brim band over the seam line: using the long white tail, stitch through the red hat and the green base, but primarily through the base to secure it flat. Use hidden whip stitch or mattress stitch to keep visible front tidy (approx 15 evenly spaced stitches).
Round 3 : Sew the pompom/flower to the slouch tip securely with multiple passes. Knot and weave tail into back of hat. Trim any stray ends close to the weave.
Info : Weave in all ends at least 2-3 cm into the fabric using a yarn needle. For extra security around the brim and hat seam, take a few extra passes and tie a small knot buried in the seam before trimming the tails.
Round 4 : Optional: add a small stitch or two through the hat slouch into the base behind the brim to anchor the slouch and prevent it flipping forward when handled. This is purely optional and helps the hat keep a neat profile.
Info : Final check: make sure the reinforced eyelet holes are clear; if any yarn is blocking them, trim or unpick a few stitches and re-work that portion to allow a clean hole for hanging or threading.
— Finishing Touches & Variations :
Info : Optional embroidered details: a tiny embroidered line at the hat corner or a few French knots on the brim create extra charm. For a sparkly look, run a fine metallic thread through the brim’s rows or lightly brush with a little fabric-safe glitter glue.
Variation 1 : For a smaller coaster-size version, work the base to 48 sts rounds earlier (stop increases sooner) so the square becomes ~4.5″ wide. Adjust hat brim width to match. For a larger placemat-sized version, add additional increase rounds early in the base and increase the hat opening by scaling the brim accordingly.
Variation 2 : Use chunky yarn and a larger hook to make a bold, textured square, or cotton yarn for a practical coaster that resists moisture. For safety with young children, replace any small pompoms with sewn flat flowers.
Assembly
- Attach the red hat cone to the base by placing the hat opening over the marked area on the green square. Pin in place, then sew using the long tail from the hat opening. Use even small whip stitches around the opening, catching both the hat edge and the base fabric for a secure seam.
- Sew the white brim band over the seam line: align the band so it slightly overlaps both the green base and the red hat. Using the long white tail, stitch through the band and into the base with hidden whip stitches to conceal the seam.
- Position the little white pompom/flower at the tip of the slouched hat. Secure it through several passes into the hat tip with red or white yarn, tie a secure knot, and weave the tail inside the hat to hide.
- Reinforce the four eyelet holes by stitching around the ch-3 loops: work (sc, hdc, sc) into each loop to strengthen edges. Test by threading a ribbon or twine through each to ensure they hold.
- Weave all loose ends on the inside/back of the square for a neat finish. Trim tails close to the weave. Block the finished square gently if desired to flatten and shape corners.
- Optional: add a couple of anchoring stitches from the inside of the hat into the base behind the brim to keep the slouch sitting correctly; this prevents flipping when the piece is handled.
💡 Important notes
- Use stitch markers consistently at the beginning of each round to avoid counting errors and maintain proper shaping
- Stuff small puff elements gradually as you work rather than waiting until the end, especially for the pompom flower
- For the hat cone, use a slightly smaller hook than the base to obtain firmer fabric that keeps its shape
- When changing colors, fasten off neatly and weave ends inside layers where possible to avoid visible floats
- Pin pieces in place before sewing to ensure symmetry and correct placement; photograph or mark positions if making multiples
- Work the brim band slightly larger than the hat opening if you prefer a gathered look; reduce if you want a snug band
- Reinforce eyelet holes by stitching around them after making chain loops to prevent stretching with use
- Test-fit the hat and brim on the base before final sewing to ensure proportions and slouch direction meet your preference
⚠️ Common mistakes to avoid
- Skipping stitch markers at round starts can cause misaligned corners and uneven square shaping; always mark your first stitch of each round
- Changing color without fastening off or carrying yarn neatly can leave loose floats on the back; weave ends or carry yarn inside for tidy work
- Crocheting too loosely for amigurumi-style appliques causes stuffing or shape collapse; use a slightly smaller hook for the hat to keep it firm
- Not counting increases carefully will warp the square and distort corner placement; recount at the end of each increase round
- Attaching the hat before finishing background border makes placement fiddly; complete the base and border first, then pin the hat in place
- Overstuffing any padded elements (if you make a 3D pompom) creates lumps; stuff sparingly and shape with hands
- Working the brim in the wrong loop direction (BLO vs FLO) can change texture; read Info sections carefully before rounds that specify BLO or FLO
- Using safety eyes or beads without securing properly can be hazardous for small children; prefer embroidered details for toys
Make it your own
I absolutely love how this pattern can be adjusted — try bright cranberry red for a modern twist or soft blush pink for a whimsical take. Swap the green base for a neutral beige to make the hat pop in any room. I often make the brim extra puffy with an extra puff-row for a vintage, cozy look.
I recommend experimenting with the brim technique: use fewer loops per puff for a neater look, or more loops for a plush, faux-fur texture. For garlands, make several squares and string them through the reinforced eyelets — needle and twine work well.
Frequently asked questions
What is the finished size of this item?
Using worsted weight yarn and the stated hook sizes, the finished square measures approximately 4.5" x 6" (11.5 x 15 cm). Changing yarn weight or hook size will change the final dimensions proportionally.
Can I use different yarn weights for this pattern?
Yes! You can use any yarn weight. For a tight fabric keep hook size 1-2 sizes smaller than the yarn label recommends. Bulky yarn will yield a larger, squishier square while cotton will produce a firmer coaster.
Do I need to use a pompom or can I make a flat flower?
Both work well. The flat puff-flower is safer for gifts to young children and easier to sew flat. A 3D pompom adds cute dimension; secure it with multiple stitches.
How much yarn will I need?
Approximately 80-100g green, 25-35g red and 25-30g white worsted yarn. Small extra scraps for embroidery may be used if desired.
Can I make the hat removable?
Yes. Sew only a few anchoring stitches through the red hat and the base rather than a full seam, or attach with small snap buttons hidden under the brim to make a removable hat.
How do I create the eyelet holes?
Create small ch-3 loops in one round (as instructed), then work sc stitches around those loops in the next round to reinforce. This forms neat, usable holes for hanging.
How do I keep the brim fluffy?
Use puff cluster stitches worked with multiple loop pulls for each puff, and avoid pulling the last loop closed too tightly. A slightly smaller hook can make puffs denser; a larger one makes them fluffier.
Can I customize colors and details?
Absolutely — change the hat color, use variegated yarn for a playful brim, or embroider tiny motifs on the green base to personalize the square.
This cheerful Santa Hat Granny Square brings a little handmade holiday magic to mugs, cushions, and garlands. The compact square and textured brim are quick to work and satisfyingly festive. With a few simple finishing steps you’ll have a polished little motif ready to gift or decorate 🎁🎄. Enjoy stitching, and don’t forget to share your festive creations — they’re a joy to see! 🧶✨